Affiliate Disclosure: Some links in this guide are affiliate links. If you purchase through them, we may earn a small commission at no extra cost to you. Read our full affiliate disclaimer here.
By King James Adjei — Researcher and Goldendoodle enthusiast, founder of GoldendoodleReport.com. Every guide on this site is carefully researched and written to give owners reliable, clearly organised information — updated regularly and honest about uncertainty. → About this site
📖 8-minute read | Last updated April 2026 | Reviewed for accuracy
Goldendoodle nail trimming is one of the grooming tasks owners are most anxious about — and most commonly neglect as a result. Overgrown nails cause real problems: pain when walking, altered gait that stresses joints over time, and an increased risk of the nail catching and tearing. This guide gives you everything needed to trim nails confidently at home — the anatomy you need to understand, the tools, the step-by-step technique, what to do when the quick is cut, and how often to trim.
👤 Who This Guide Is For
- You want to trim your Goldendoodle’s nails at home and need the complete technique
- You are anxious about cutting the quick and want to understand how to avoid it and what to do if it happens
- Your Goldendoodle’s nails are clicking on the floor and you want to address it
- You want to reduce professional grooming costs by handling nail trimming between appointments
⚡ Quick Summary
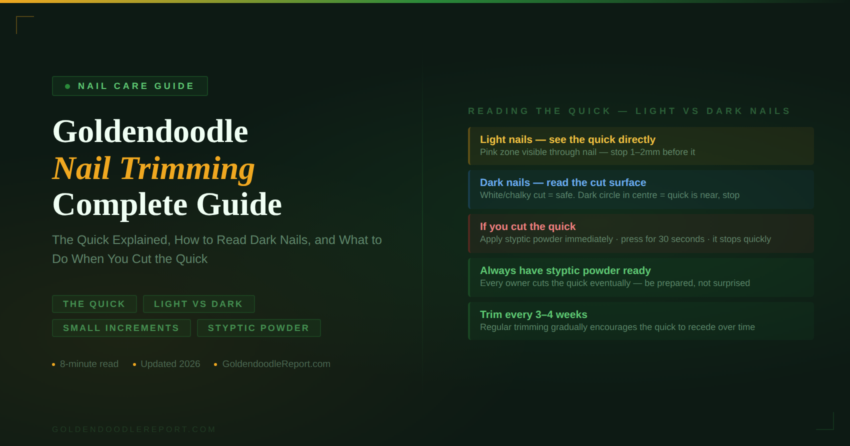
Trim Goldendoodle nails every 3 to 4 weeks — or whenever you hear clicking on hard floors. Use a guillotine clipper, scissor clipper, or nail grinder. Cut small amounts at a time — 1 to 2mm increments — working from the tip toward the quick rather than attempting to cut close in one pass. On light-coloured nails you can see the quick as a pink area — stop before reaching it. On dark nails, look at the cut surface — when a small dark circle appears in the centre, you are near the quick and should stop. Always have styptic powder available before starting.
✅ Quick Answer — Nail Trimming Step by Step
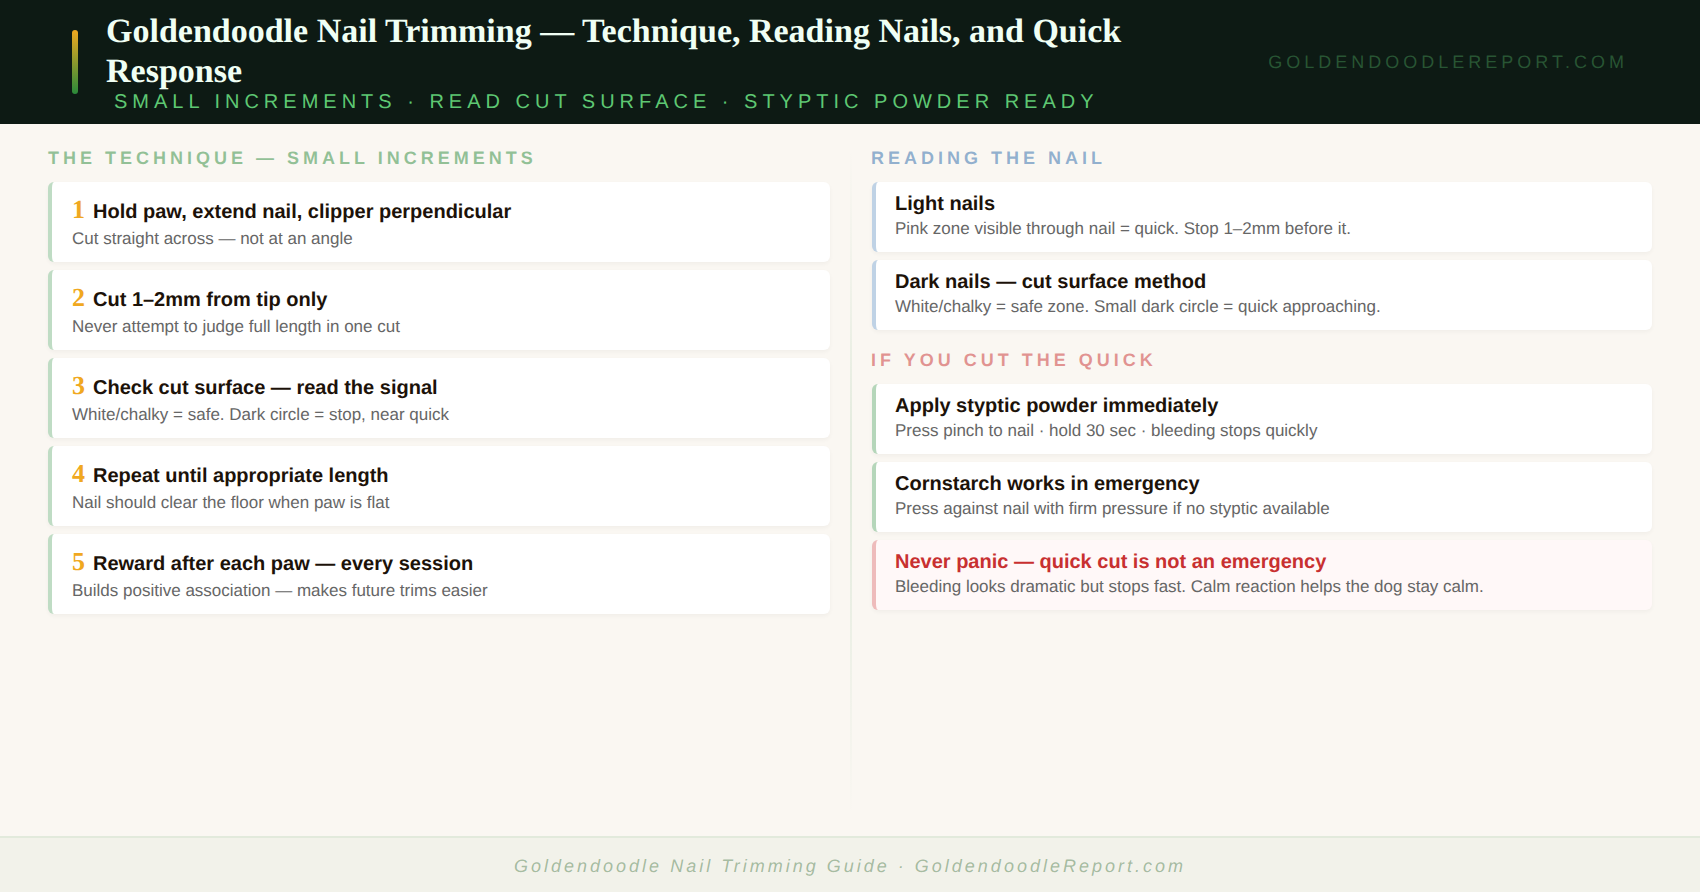
- Hold the paw firmly with the nail extended and visible
- Position the clipper perpendicular to the nail — cutting straight across
- Cut a small amount — 1 to 2mm — from the tip
- Check the cut surface — white or chalky = safe to continue; dark circle in centre = stop, near the quick
- Repeat in small increments until the appropriate length is reached
- If the quick is cut — apply styptic powder immediately and hold for 30 seconds
- Reward after each paw to build positive association with the process
For the complete grooming overview see Goldendoodle Grooming Guide. For nail trimming frequency see 👉 How Often to Trim Goldendoodle Nails — coming soon.
Understanding the Quick — The Key to Safe Nail Trimming
The quick is the living core of the nail — a blood vessel and nerve bundle that runs through the centre of the nail from the base toward the tip. Cutting into the quick causes pain and bleeding. Cutting beyond the quick removes only dead nail tissue and is painless.
Understanding the quick removes most of the anxiety from nail trimming. The goal is not to cut as short as possible in one attempt — it is to cut small amounts, check the cut surface, and stop when the quick is approached. This approach eliminates the risk of deeply cutting the quick and makes the process predictable.
The quick on light-coloured nails is visible through the nail as a pink zone that begins at the base and extends toward the tip. The nail tip beyond the pink zone is the safe cutting area. Look at the nail from the side under good light — the pink zone is clearly visible. Stop cutting when you are within 1 to 2mm of the visible pink area.
The quick on dark or black nails is not visible from the outside. Instead, read the cut surface after each small cut. A fresh cut on a dark nail appears white or chalky when you are still in the safe dead nail zone. As you approach the quick, a small dark or grey circle appears in the centre of the cut surface — this is the beginning of the quick. Stop immediately when this dark circle appears.
Tools for Nail Trimming
Scissor-style (bypass) clippers
The most commonly recommended nail clipper type for dogs. Two curved blades that close against each other like scissors. Available in sizes appropriate for medium to large dogs — Goldendoodle-appropriate sizes are labelled medium or large. The scissor style gives good control and produces a clean cut.
Guillotine-style clippers
A fixed blade drops down through a hole in which the nail is placed. Some owners find these easier to control for nervous dogs because the nail is fully positioned before the cut is made. Less commonly used than scissor-style but equally effective when sharp.
Nail grinder
A rotary tool that grinds the nail down gradually rather than cutting. Produces no risk of a sudden deep cut into the quick — the gradual removal makes approaching the quick more controlled. The disadvantage is noise and vibration, which many dogs need time to adjust to. A grinder also takes significantly longer than clippers. See → Best Nail Grinder for Goldendoodles — coming soon.
The most important quality in any nail tool: sharpness. Dull clippers crush the nail rather than cutting cleanly, which is painful and causes nail cracking. Replace or sharpen clippers regularly — at least annually for dogs trimmed every 3 to 4 weeks.
Styptic powder — essential
Keep styptic powder within reach before starting every nail trimming session. Styptic powder stops bleeding from a cut quick within 30 seconds. Cutting the quick happens to every owner eventually — having styptic powder available means the response is immediate and effective. If styptic powder is unavailable, cornstarch or flour applied with pressure can work in an emergency.
How to Trim Goldendoodle Nails — Full Technique
Preparation and positioning
Choose a calm moment. Have styptic powder, clippers, and treats ready. Position the dog on a non-slip surface — on the floor with you kneeling, or on a grooming table if available. Hold the paw firmly but gently, extending one nail at a time by pressing the pad from above to expose the nail.
The small-increment approach
Position the clipper perpendicular to the nail — cutting straight across the nail, not at an angle. Make a small cut — approximately 1 to 2mm — from the very tip of the nail. After each cut, look at the cut surface to read where you are relative to the quick. Continue making small cuts, checking after each one, until you reach the appropriate length or the dark circle warning sign appears on dark nails.
This incremental approach is significantly safer than attempting to judge the correct length visually from the outside and cutting in one pass. It also produces a cleaner result and causes significantly less discomfort even when close to the quick.
Which nails to trim
All four paws, including the dewclaw if present. The dewclaw — the small claw higher on the inner leg — does not touch the ground and does not wear down naturally. It grows in a curve and, if not trimmed, can curve back and embed in the leg. Check the dewclaws specifically at every nail trimming session.
If the quick is cut
Apply styptic powder immediately — dip the nail tip into the powder or press a pinch directly against the cut surface. Apply firm pressure for 30 seconds. The bleeding stops quickly with styptic powder. If you do not have styptic powder, press cornstarch against the nail with firm pressure. Do not panic — a cut quick bleeds noticeably but is not a medical emergency. The dog will be uncomfortable for a few moments and then recover. Reward the dog and end the session for that paw.
After cutting the quick, the dog may be more resistant to nail trimming in subsequent sessions. Counter this with extra positive reinforcement — treats, praise, and very short sessions — over the following weeks to rebuild a positive association.
How Often to Trim Goldendoodle Nails
Every 3 to 4 weeks for most Goldendoodles. The practical test: if you can hear the nails clicking on hard floors, they are too long. Nails should clear the floor when the dog is standing — if the nail touches the floor when the paw is flat, it is overdue for trimming.
Regular trimming has an additional benefit: it gradually encourages the quick to recede further into the nail over time. Dogs with very long-neglected nails often have quicks that extend almost to the nail tip, making it impossible to trim the nail short without cutting the quick. Regular every-3-to-4-week trimming gradually shortens the quick over months, allowing progressively shorter trims.
For authoritative guidance on dog nail care see the AKC dog grooming guide.
⚠️ Signs Nails Are Too Long
- Clicking sound on hard floors when the dog walks
- Nails touching the floor when the paw is flat on a hard surface
- The dog walking with their toes splayed outward to compensate for nail contact
- Nails visibly curving — particularly the dewclaws
- The dog frequently catching a nail on carpet or fabric
✅ Your Next Step
Purchase styptic powder before your first nail trimming session — this is the preparation step most owners skip and then regret. With styptic powder ready, the worst case scenario (cutting the quick) becomes a manageable 30-second response. For the complete grooming guide see Goldendoodle Grooming Guide.
🔑 Key Takeaways
- The quick is the living blood vessel core of the nail — cutting into it causes bleeding and pain. Cut the white/dead portion only
- On light nails: the quick is visible as a pink zone — stop 1 to 2mm before it. On dark nails: read the cut surface — white = safe, dark circle = stop
- Cut in small 1 to 2mm increments and check after each cut — do not try to judge the full length in one cut
- Always have styptic powder ready before starting — cutting the quick happens to every owner eventually
- Trim every 3 to 4 weeks — regular trimming gradually encourages the quick to recede, allowing progressively shorter trims over time
- Check the dewclaws specifically — they do not touch the ground and can curve back into the leg if neglected
📚 Continue Learning
- Goldendoodle Grooming Guide — complete grooming authority guide
- How to Trim a Goldendoodle at Home — all home trimming tasks
- Goldendoodle Grooming Schedule — nail trimming in the routine
- → How Often to Trim Goldendoodle Nails — coming soon
- → Best Nail Grinder for Goldendoodles — coming soon
↑ Back to: How to Trim a Goldendoodle at Home | Goldendoodle Grooming Guide | Goldendoodle Grooming — All Articles
Frequently Asked Questions
How do I trim my Goldendoodle’s nails at home?
Hold the paw firmly and position the clipper perpendicular to the nail. Cut small 1 to 2mm increments from the tip, checking the cut surface after each cut. On light nails, stop when you are 1 to 2mm from the visible pink quick. On dark nails, stop when a small dark circle appears in the centre of the cut surface — this indicates the quick is near. Always have styptic powder ready before starting. Reward after each paw to build a positive association.
How do I avoid cutting the quick when trimming Goldendoodle nails?
Cut in very small increments — 1 to 2mm at a time — and read the cut surface after each cut rather than trying to judge the full safe length in one pass. On light nails, the quick is visible as a pink zone — stop well before reaching it. On dark nails, stop immediately when a small dark circle appears in the centre of the cut surface. The small-increment approach makes cutting the quick significantly less likely than attempting to cut the full amount in one confident cut.
What do I do if I cut my Goldendoodle’s quick?
Apply styptic powder immediately — press a pinch of it against the cut nail surface or dip the nail tip into it. Hold firm pressure for 30 seconds. The bleeding stops quickly with styptic powder. If you do not have styptic powder, cornstarch pressed against the nail with firm pressure works in an emergency. Reward the dog, end the session for that paw, and treat the experience with matter-of-fact calmness rather than distress — the dog takes emotional cues from the owner’s reaction.
How often should I trim my Goldendoodle’s nails?
Every 3 to 4 weeks. The clicking test is the most reliable indicator — if you hear nails clicking on hard floors, it is time to trim. Regular trimming at this frequency gradually encourages the quick to recede further into the nail, allowing progressively shorter trims over months. Dogs whose nails are only trimmed occasionally often have extended quicks that prevent short trimming — the regularity is what makes nail maintenance easier over time.
Disclaimer: The information in this article is provided for general educational purposes only. King James Adjei is a researcher and enthusiast, not a veterinarian or certified groomer. For nail or paw health concerns beyond routine maintenance, consult a qualified veterinarian.