Affiliate Disclosure: Some links in this guide are affiliate links. If you purchase through them, we may earn a small commission at no extra cost to you. Read our full affiliate disclaimer here.
By King James Adjei — Researcher and Goldendoodle enthusiast, founder of GoldendoodleReport.com. Every guide on this site is carefully researched and written to give owners reliable, clearly organised information — updated regularly and honest about uncertainty. → About this site
📖 7-minute read | Last updated April 2026 | Reviewed for accuracy
Detangling a Goldendoodle coat is a skill that every owner needs — because every Goldendoodle develops tangles, and the difference between a tangle that takes 5 minutes to work out and one that requires professional dematting is almost entirely in the technique. The most common mistake is working from the skin outward — pulling the tangle through itself and tightening it. The correct approach is the opposite. This guide covers the complete detangling technique, the right tools, product use, and the point at which professional help is the correct next step.
👤 Who This Guide Is For
- Your Goldendoodle has tangles and you want to work through them correctly without causing pain
- Your normal brushing is not working through a section of coat and you want the correct technique
- You want to understand when a tangle can be worked out at home versus when it is a mat requiring professional help
- You want to build effective detangling into your regular grooming routine
⚡ Quick Summary
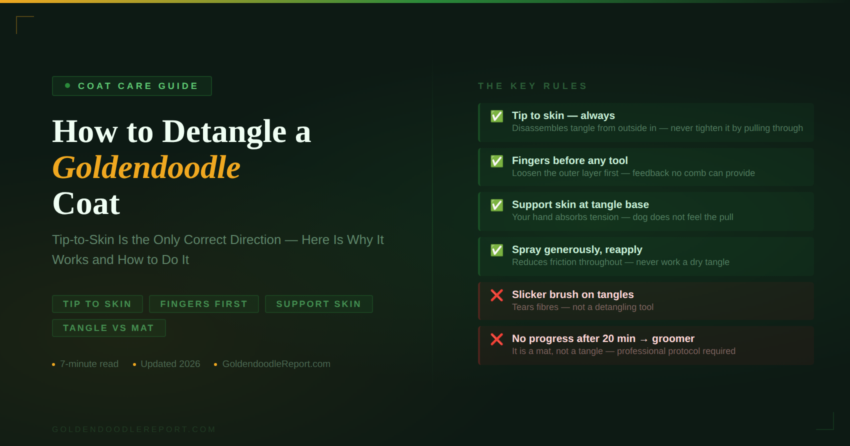
Always work from tip to skin — never from skin to tip. Apply detangling spray generously before starting. Support the skin at the tangle base with your free hand throughout. Use fingers to loosen the outer tangle layers first, then work through with a wide-tooth comb from tip toward skin in small increments. If the comb cannot pass through and finger separation is not possible, it is a mat — not a tangle — and the mat removal protocol applies instead.
✅ Quick Answer — Detangling Step by Step
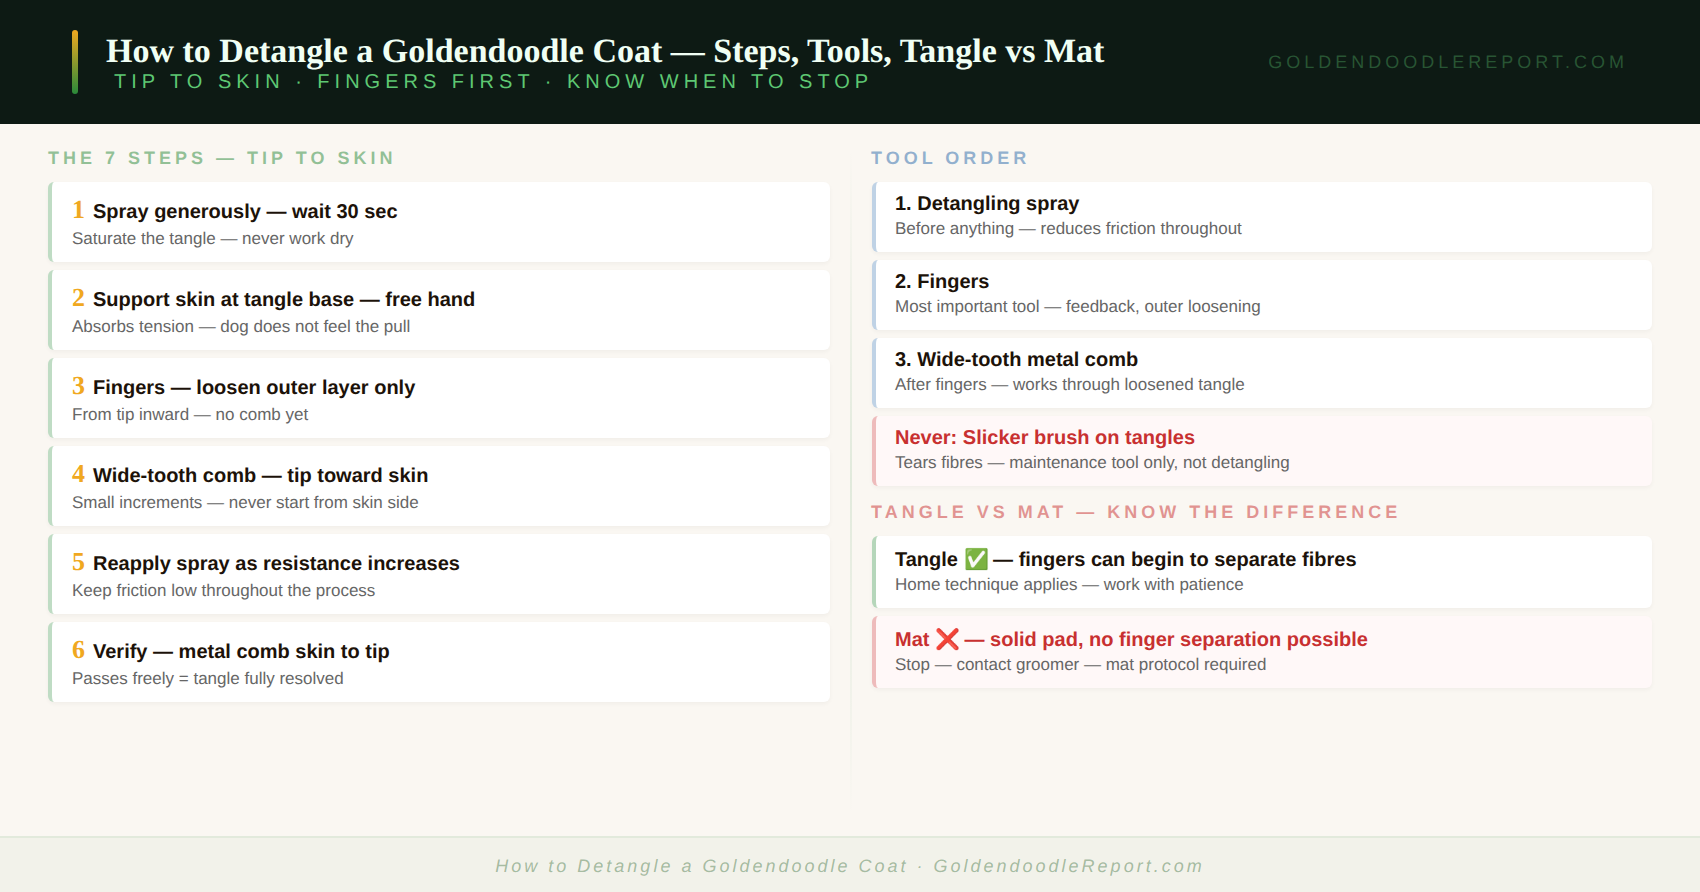
- Apply detangling spray directly to the tangled area — allow 30 seconds to penetrate
- Support the skin at the base of the tangle with your free hand
- Use fingers to gently tease apart the outermost layer of the tangle from outside inward
- Work through the loosened outer section with the wide-tooth comb — tip to skin
- Move deeper toward the skin in small increments, repeating spray → fingers → comb
- Finish with a metal comb pass from skin to tip — if it passes freely, the section is clear
- If step 3 is impossible — fingers cannot separate any fibres — stop and use the mat removal protocol
For established mats see How to Remove Mats Safely. For preventing tangles forming see Goldendoodle Matting Prevention. For the complete grooming overview see Goldendoodle Grooming Guide.
Why Tip-to-Skin Is the Only Correct Direction
Understanding why tip-to-skin is the correct direction for detangling removes the instinct to do the opposite. When you work from the skin outward through a tangle, you are pulling the tangled fibres through the rest of the tangle — effectively tightening the knot as you pull. This increases friction, increases pain, and converts a workable tangle into a tighter, denser problem. It is the mechanical equivalent of pulling the wrong end of a knot.
When you work from the tip inward, you are separating the outermost fibres first — where the tangle has the least density and the most free space for separation. Each successful pass from the tip inward loosens one layer of the tangle before you encounter the next. The tangle disassembles from outside to inside rather than being forced through itself. This is consistently faster, consistently less painful, and produces a clean result rather than a damaged tangle that is more compressed than when you started.
Tools for Detangling
Your fingers. The first and most important tool. Fingers provide feedback that no comb or brush can match — you feel exactly when you are pulling on the skin versus working through the tangle. Use fingers to perform the initial outer-layer loosening before using any other tool.
Wide-tooth metal comb. The correct tool for working through a loosened tangle. The wide spacing between teeth allows the comb to pass through without catching and dragging. Work from tip toward skin in small increments. For the complete comb selection guide see → Best Comb for Goldendoodles — coming soon.
Detangling spray. Applied before and during the detangling process, detangling spray reduces friction between coat fibres and makes separation significantly easier. Apply generously and allow 30 seconds for the spray to penetrate before starting work. Reapply during the process whenever resistance increases. For product recommendations see → Best Detangler Spray for Goldendoodles — coming soon.
What not to use for detangling: A slicker brush is not a detangling tool. It is a maintenance tool for properly brushed coat. Running a slicker brush through a tangle tears coat fibres and increases pain without resolving the tangle.
How to Detangle a Goldendoodle Coat — Full Technique
Step 1 — Identify and assess
Before starting, identify every tangle in the coat. Work through the coat with your fingers, feeling for dense or resistant areas. Press into each area with your fingers — if the fibres yield and you can feel them beginning to separate with gentle pressure, it is a tangle. If the area feels like a solid, compressed pad and no separation is possible with finger pressure, it is a mat — refer to How to Remove Mats Safely for the mat-specific protocol.
Step 2 — Apply detangling spray
Saturate the tangled area and the surrounding coat with detangling spray. Apply more than you think is necessary — a dry tangle worked with no slip is significantly more difficult and more uncomfortable than a well-lubricated one. Allow the spray 30 seconds to penetrate before beginning work.
Step 3 — Support the skin
Place your free hand flat against the skin at the base of the tangle. This is not optional — it is the step that makes the process comfortable for the dog. Any tension created during detangling is absorbed by your hand rather than transmitted to the skin. A dog who feels the pulling on their skin will become anxious and resistant. A dog whose skin is supported does not feel the tension in the same way.
Step 4 — Fingers first, outer layer only
Using the fingers of your working hand, gently tease apart the very outermost layer of the tangle. Work from the tip of the tangle — the end furthest from the skin — separating individual fibres outward. Do not reach into the tangle toward the skin at this stage. Only work the outermost accessible layer. This initial loosening with fingers is what allows the comb to work effectively in the next step.
Step 5 — Wide-tooth comb, tip to skin
Once the outer layer is loosened, use the wide-tooth comb starting at the very tip of the tangle. Place the comb just at the tip and work a small section through in a single smooth stroke. Move the starting position slightly closer to the skin for the next pass. Each pass should move freely through the section before you move closer to the skin. Never start from the skin side and drag through.
Step 6 — Reapply spray and repeat
As you work deeper toward the skin, the coat becomes denser and resistance increases. Reapply detangling spray when the comb meets significant resistance. Continue the fingers → comb cycle, working progressively closer to the skin. Patience through this stage is what produces a clean result.
Step 7 — Verify with metal comb
When the wide-tooth comb passes freely from tip to skin through the full section, follow with a metal comb pass from skin to tip. If the metal comb passes through without catching, the tangle is fully resolved. If it catches at any point, identify the location and continue working through that specific area.
Tangle vs Mat — When to Stop Home Detangling
A tangle is a loose interlocking of coat fibres that can be separated with patient technique. A mat is a compressed fusion of coat fibres that cannot be separated — the fibres are no longer individually accessible. The distinction is tactile: fingers can enter and begin to separate a tangle; fingers meet solid resistance and cannot enter a mat.
If 15 to 20 minutes of careful work with detangling spray and the correct technique produces no progress, the structure is a mat rather than a tangle. Stop and contact your groomer — attempting to force through a mat causes pain and potential skin damage. For the complete mat assessment and removal guide see How to Remove Mats Safely.
For authoritative guidance on dog coat care see the AKC dog grooming guide.
✅ Your Next Step
Check the coat now using the finger test — work through every section feeling for resistance. Any area where the fingers cannot begin to separate fibres is a developing mat that needs attention today before it progresses. For areas where fingers can begin to work, follow the detangling technique above. For the complete grooming guide see Goldendoodle Grooming Guide.
🔑 Key Takeaways
- Always work tip to skin — never skin to tip. Working from the skin outward tightens the tangle rather than resolving it
- Fingers first — use fingers to loosen the outer layer before using any tool. Fingers provide feedback no tool can match
- Support the skin at the tangle base with your free hand throughout — this makes the process comfortable for the dog
- Apply detangling spray generously and reapply when resistance increases — a lubricated tangle takes a fraction of the effort of a dry one
- A slicker brush is not a detangling tool — it tears fibres and increases pain without resolving tangles
- If fingers cannot separate any fibres after 15 to 20 minutes of correct technique, it is a mat — stop and contact your groomer
📚 Continue Learning
- Goldendoodle Grooming Guide — complete grooming authority guide
- How to Remove Mats Safely — when the tangle has become a mat
- Goldendoodle Matting Prevention — stopping tangles before they form
- How to Brush a Goldendoodle — regular brushing that prevents tangles
- → Best Comb for Goldendoodles — coming soon
- → Best Detangler Spray for Goldendoodles — coming soon
- → How to Line Brush a Goldendoodle — coming soon
↑ Back to: Goldendoodle Grooming Guide | Goldendoodle Grooming — All Articles
Frequently Asked Questions
How do I detangle my Goldendoodle’s coat without hurting them?
Apply detangling spray generously and allow it to penetrate. Support the skin at the base of the tangle with your free hand — this prevents the pulling being felt on the skin. Use fingers to loosen the outer layer first. Then work through with a wide-tooth comb from tip to skin in small increments — never from the skin outward. Stop immediately if the dog shows pain signals and assess whether the tangle has progressed to a mat requiring professional help.
What is the best tool for detangling a Goldendoodle coat?
Your fingers are the most important first tool — they provide feedback no comb can match and perform the initial outer-layer loosening that makes everything easier. A wide-tooth metal comb is the correct tool for working through the loosened tangle. A slicker brush is not a detangling tool and should not be used on tangles — it tears coat fibres rather than separating them. Detangling spray is essential for reducing friction and making the process effective.
Why does detangling cause my Goldendoodle pain?
The most common cause is working from the skin outward — this direction tightens the tangle with every pass rather than resolving it, and transmits all the tension directly to the skin. Working tip to skin, supporting the skin with your free hand, and applying detangling spray before starting eliminates most of the pain associated with detangling. If pain persists with correct technique, the structure may be a mat rather than a tangle — mats require professional assessment.
When should I stop trying to detangle and call the groomer?
Stop and contact your groomer when: fingers cannot separate any fibres in the affected area after 15 to 20 minutes of careful work; the dog is showing significant pain responses; or the affected area feels like a solid, compressed pad with no give. These signs indicate an established mat rather than a tangle — forcing through an established mat causes pain and potential skin damage that professional technique avoids. See How to Remove Mats Safely for the complete mat assessment guide.
Disclaimer: The information in this article is provided for general educational purposes only. King James Adjei is a researcher and enthusiast, not a veterinarian or certified groomer. For significant matting or coat conditions, consult a qualified professional groomer.