
Affiliate Disclosure: Some links in this guide are affiliate links. If you purchase through them, we may earn a small commission at no extra cost to you. Read our full affiliate disclaimer here.
By King James Adjei — Researcher and Goldendoodle enthusiast, founder of GoldendoodleReport.com. Every guide on this site is carefully researched and written to give owners reliable, clearly organised information — updated regularly and honest about uncertainty. → About this site
📖 6-minute read | Last updated April 2026 | Reviewed for accuracy
Hair growing over a Goldendoodle’s eyes is one of the most common in-between-appointment issues owners deal with — and one of the safest home trimming tasks available, when done correctly. The key word is correctly. Scissors near a dog’s face while the dog moves is a genuine injury risk, and the difference between safe eye trimming and a scissors injury is almost entirely in the tool choice and one specific technique step. This guide covers the exact technique, the only scissors that should be used near a dog’s face, the positioning that minimises risk, and the frequency that keeps the eye area clear.
👤 Who This Guide Is For
- Hair is growing over your Goldendoodle’s eyes between professional appointments and you want to trim it safely at home
- You want to know which scissors are safe to use near the eye area
- You want to understand the correct technique so the trimming is safe rather than risky
- You want to know how often the eye area needs trimming to stay clear
⚡ Quick Summary
Trimming hair around Goldendoodle eyes requires blunt-nosed (rounded-tip) scissors — never pointed scissors near the face. Use a fine-tooth comb to lift the hair above the eye before cutting. Cut horizontally across the comb, above the eye surface, with the scissors pointing away from the eye. Never cut downward toward the eye. If the dog is restless, stop and return when calm — one eye trimmed safely is better than both trimmed under stress. Most Goldendoodles need eye area trimming every 2 to 4 weeks depending on coat growth rate.
✅ Quick Answer — Eye Trim Step by Step
- Use blunt-nosed scissors only — no pointed scissors near the face
- Sit or kneel at the dog’s level — calm, comfortable position for both
- Use a fine-tooth comb to lift the hair above the eye upward and away from the eye surface
- Position blunt-nosed scissors horizontally across the hair, above the eye, pointing away from the face
- Cut in one smooth horizontal line along the comb — remove enough to clear the eye completely
- Check the result — the eye should be fully visible with no hair resting on it
- If the dog moves during cutting — stop immediately, do not attempt to continue mid-cut
For the home trimming overview see How to Trim a Goldendoodle at Home. For the complete grooming overview see Goldendoodle Grooming Guide.
The Non-Negotiable: Blunt-Nosed Scissors Only
The single most important rule in trimming hair around Goldendoodle eyes is the scissors requirement. Blunt-nosed scissors — also called rounded-tip or safety-tip scissors — have rounded tips rather than pointed tips. This is not a preference. It is a safety requirement.
When a dog moves unexpectedly with pointed scissors near their face — which every dog does eventually regardless of how well-trained they are — the pointed tip of a standard scissor becomes a puncture risk to the eye or surrounding tissue. Blunt-nosed scissors eliminate this specific risk because the rounded tip cannot puncture tissue on contact. The cut they produce is identical to pointed scissors. The safety difference is significant.
Blunt-nosed grooming scissors are available at most pet stores and online. They are the first purchase any owner should make before attempting any home trimming near the face. Do not use kitchen scissors, craft scissors, sewing scissors, or any scissors with pointed tips near the eye area regardless of how careful you intend to be.
When to Trim — Reading the Signs
The eye area needs trimming when hair is resting on the eye surface, visibly obstructing the dog’s field of vision, or accumulating moisture below the eye faster than usual because longer hair is wicking tears down the face. These are practical indicators rather than a fixed schedule — some Goldendoodles need eye area trimming every 2 weeks, others every 4 to 6 weeks depending on individual coat growth rate.
An additional indicator: if the dog is pawing at their eyes more than usual, check whether hair is contacting the eye surface. Hair resting on the cornea causes chronic low-level irritation that increases discharge and rubbing. Trimming to clear the eye often resolves the pawing without any other intervention.
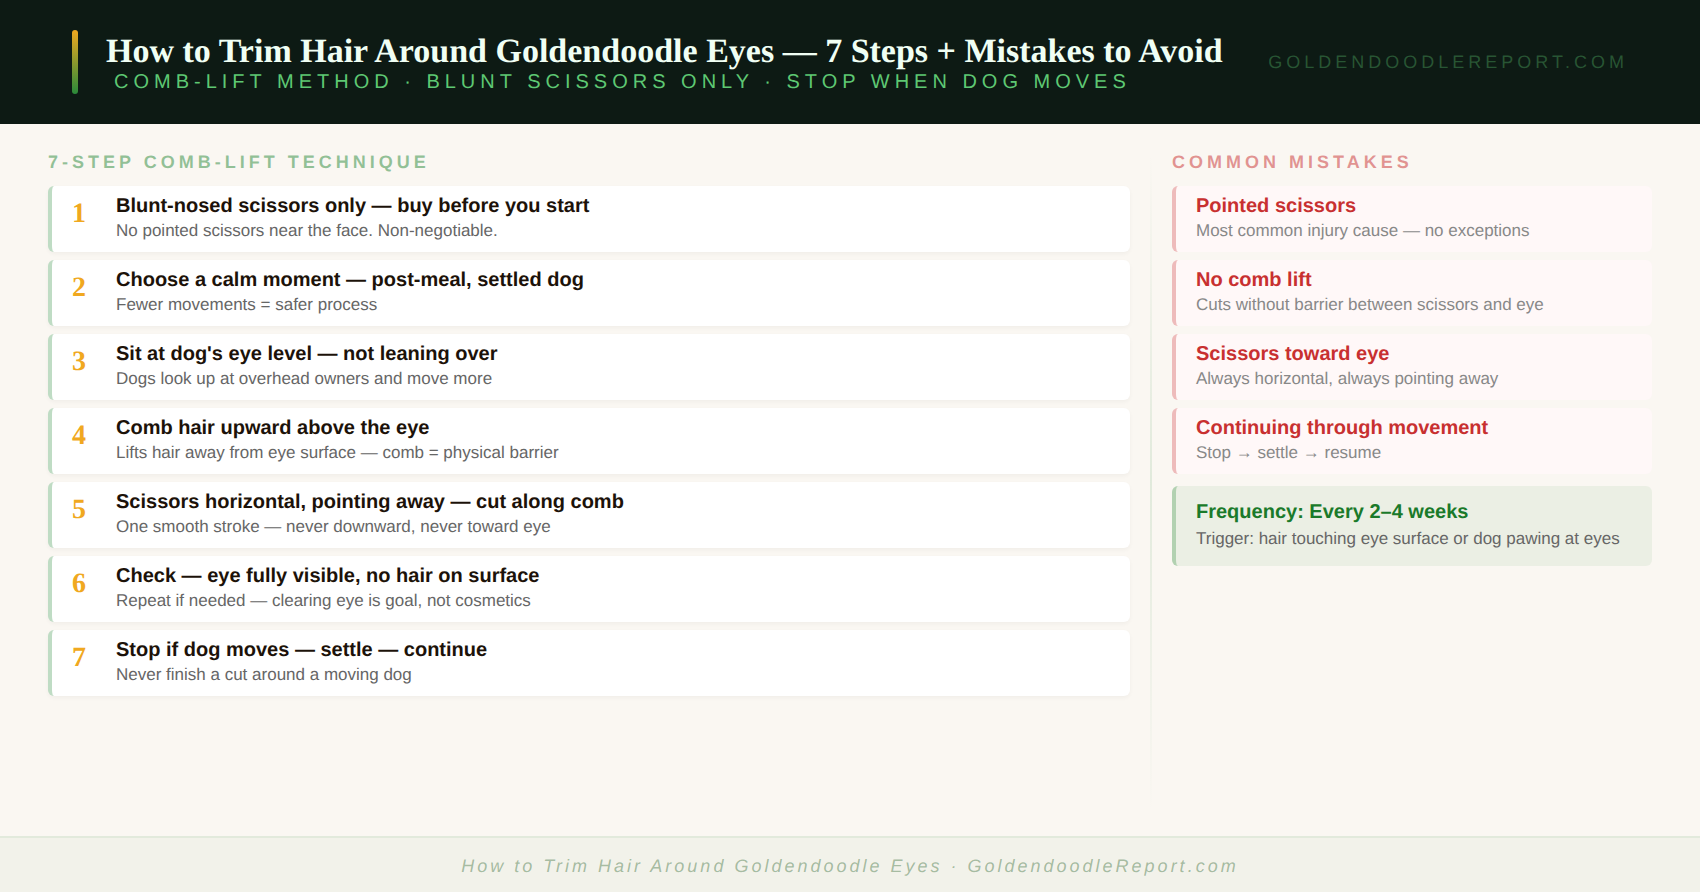
How to Trim Hair Around Goldendoodle Eyes — Full Technique
Before you start
Choose a moment when the dog is calm and settled — not when they have just had exercise or are in a playful or anxious state. The fewer unexpected movements the dog makes during trimming, the safer the process. Many owners find the best time is during the dog’s post-meal relaxed period.
Have everything ready before you start: blunt-nosed scissors and a fine-tooth comb. Clean the eye area first if there is any discharge or dried crust — see How to Clean Goldendoodle Eyes Safely for the technique. Trimming on a clean eye area gives a clearer view of what needs to be removed.
Step 1 — Position yourself and the dog
Sit or kneel at the dog’s level rather than leaning over them. A dog who has to look up at an owner leaning over their face is more likely to move. Position the dog in front of you at your eye level — sitting naturally or held gently by a second person if the dog is very active.
Step 2 — Comb the hair upward above the eye
This is the technique step that makes eye trimming safe. Place a fine-tooth comb horizontally above the eye and comb the hair upward and away from the eye surface. The comb lifts the hair away from the eye and also creates a guide line for the scissors. The hair sits above the comb, separated from the eye surface by the comb itself. This means that even if the dog moves slightly while you are cutting, the comb provides a physical barrier between the scissors and the eye.
Step 3 — Position scissors horizontally above the eye
Hold the blunt-nosed scissors horizontally — parallel to the eye, pointing away from the face, not toward it. The scissors should be above the comb, cutting the hair that sits above the comb away from the eye. The critical safety rule: the scissors tips always point away from the eye, never toward it. If at any point the scissors are pointing toward the eye, stop and reposition.
Step 4 — Cut in one smooth horizontal stroke
Cut across the hair above the comb in a single smooth horizontal stroke. Remove enough hair that when the comb is removed, the eye is fully visible with no hair resting on it. One confident stroke is better than multiple small snips — the more time the scissors spend near the face, the more opportunity for the dog to move.
Step 5 — Check and repeat if needed
Remove the comb and look at the eye. The eye should be fully visible with no hair obscuring it and no hair resting on the eye surface. If the eye is still partially obscured, repeat the comb-lift and cut process. Do not try to achieve a perfectly neat trim in the first session — clearing the eye completely is the goal; cosmetic neatness is secondary to safety.
Step 6 — Stop if the dog moves
If the dog moves during any part of the cutting process, stop immediately. Do not attempt to continue mid-cut around a moving dog. Allow the dog to settle, return to a calm state, and then continue. One eye safely trimmed with a break in between is a better outcome than rushing through both with an anxious dog.
For authoritative guidance on safe dog grooming at home see the AKC dog grooming guide.
⚠️ Common Eye Trimming Mistakes That Cause Injuries
- Using pointed scissors: The most common cause of scissor injuries near dog eyes. There is no situation where pointed scissors are necessary for eye area trimming
- Pointing scissors toward the eye: Always horizontal, always pointing away from the face. If the scissors tip is directed toward the eye, reposition before cutting
- Skipping the comb lift: Cutting directly at the eye without lifting the hair with a comb first removes the key safety barrier between scissors and eye
- Continuing when the dog moves: Stop. Settle. Continue. Never attempt to finish a cut around a moving or struggling dog
- Cutting downward toward the eye: Only cut horizontally across the eye — never in a downward direction toward the eye surface
✅ Your Next Step
If you do not have blunt-nosed scissors, purchase a pair before attempting any eye area trimming — this is the single most important preparation step. Once you have the right scissors, the technique described above takes under 2 minutes per eye and makes a visible difference to both the dog’s comfort and their appearance between professional appointments. For the complete grooming guide see Goldendoodle Grooming Guide.
🔑 Key Takeaways
- Blunt-nosed scissors are non-negotiable for eye area trimming — pointed scissors near the face are a genuine injury risk when the dog moves unexpectedly
- The comb-lift technique — combing hair upward above the eye before cutting — is the safety step that separates safe home trimming from risky home trimming
- Always cut horizontally, pointing scissors away from the face — never downward toward the eye
- Stop immediately if the dog moves — settle and continue rather than rushing through around a moving dog
- Most Goldendoodles need eye area trimming every 2 to 4 weeks depending on coat growth rate
- Clearing the eye completely is the goal — cosmetic neatness is secondary to safety
📚 Continue Learning
- Goldendoodle Grooming Guide — complete grooming authority guide
- How to Trim a Goldendoodle at Home — all safe home trimming areas
- How to Clean Goldendoodle Eyes Safely — pre-trim eye cleaning
- Goldendoodle Tear Stains Guide — how eye hair length affects staining
- Goldendoodle Eye Discharge Causes — hair contact and discharge
- Goldendoodle Grooming Schedule — building eye trimming into the routine
↑ Back to: How to Trim a Goldendoodle at Home | Goldendoodle Grooming Guide | Goldendoodle Grooming — All Articles
Frequently Asked Questions
How do I trim the hair around my Goldendoodle’s eyes at home?
Use blunt-nosed scissors only — never pointed scissors near the face. Place a fine-tooth comb horizontally above the eye and comb the hair upward away from the eye surface. Hold the blunt-nosed scissors horizontally above the comb, pointing away from the face. Cut across the hair above the comb in one smooth stroke. Remove enough hair that the eye is fully visible with no hair resting on it. Stop immediately if the dog moves and settle before continuing.
What scissors should I use to trim my Goldendoodle’s eye area?
Blunt-nosed scissors — also called rounded-tip or safety-tip scissors — are the only appropriate choice for trimming near a dog’s eyes. Standard scissors, kitchen scissors, craft scissors, or any scissors with pointed tips should not be used near the eye area. The rounded tip eliminates the puncture risk when the dog moves unexpectedly. Blunt-nosed grooming scissors are available at most pet stores and are the single most important purchase for safe home eye trimming.
How often does a Goldendoodle need eye area trimming?
Every 2 to 4 weeks for most Goldendoodles — the exact frequency depends on the individual dog’s coat growth rate. Fast-growing coats may need attention every 2 weeks. Slower-growing coats may stay clear for 4 to 6 weeks. The practical trigger is when hair is resting on the eye surface, visibly obstructing vision, or causing the dog to paw at their eyes more than usual. Adding a quick eye check to the weekly brushing session is the easiest way to catch the need for trimming before it becomes an irritation issue.
Why does my Goldendoodle keep getting eye discharge after trimming?
This is typically not caused by the trimming itself — it is more likely that the hair was already irritating the cornea before trimming and the discharge will reduce once the eye is clear and stable. If discharge continues or increases after trimming, the cause may be something other than hair contact — see Goldendoodle Eye Discharge Causes for the full discharge triage guide.
Disclaimer: The information in this article is provided for general educational purposes only. King James Adjei is a researcher and enthusiast, not a veterinarian or certified groomer. If you are not comfortable trimming near the eye area at home, a professional groomer can perform this maintenance between appointments.