Affiliate Disclosure: Some links in this guide are affiliate links. If you purchase through them, we may earn a small commission at no extra cost to you. Read our full affiliate disclaimer here.
By King James Adjei — Researcher and Goldendoodle enthusiast, founder of GoldendoodleReport.com. Every guide on this site is carefully researched and written to give owners reliable, clearly organised information — updated regularly and honest about uncertainty. → About this site
📖 7-minute read | Last updated April 2026 | Reviewed for accuracy
Knowing how to dry a Goldendoodle coat correctly is the step that determines how the coat behaves for the next three to four weeks — yet it is the step most owners give the least attention to. A Goldendoodle that is air-dried after a bath is being set up for post-bath smell, matting, and a frizzy unmanageable coat before the next grooming appointment. A Goldendoodle that is blow-dried correctly with a brush comes out of the bath with a smooth, settled coat that is easier to maintain and stays cleaner longer. This guide covers how to dry a Goldendoodle coat correctly — the tools required, the order to work through, and the mistakes that cause the most common post-bath problems.
👤 Who This Guide Is For
- Your Goldendoodle smells within a few days of bathing and you suspect incomplete drying is the cause
- The coat comes out of the bath frizzy and harder to manage than before
- You are currently air-drying and want to know if it matters and what to do instead
- You want to know the correct technique for drying a Goldendoodle coat with a brush and dryer
⚡ Quick Summary
How to dry a Goldendoodle coat correctly: use a dog dryer or low-heat hairdryer with a brush, working through the coat in sections from skin to tip. Start with the areas that hold moisture longest — behind the ears, under the front legs, between the back legs — before moving to the body coat. The coat is not dry until no cool or damp patches remain at skin level. Air-drying is not an acceptable alternative — it causes post-bath smell, sets tangles into mats, and leaves the coat in a compressed, frizzy state.
✅ Quick Answer — How to Dry a Goldendoodle Coat Step by Step
- Squeeze excess water from the coat — never rub or wring
- Press with a towel to absorb surface moisture — do not rub
- Set dryer to low heat — never high heat directly on the coat
- Start with high-moisture areas: behind ears, under front legs, groin
- Part the coat and direct dryer at skin level while brushing outward
- Work section by section across the full coat
- Check for damp patches at skin level — keep drying until none remain
For the complete bathing guide that precedes drying see How to Bathe a Goldendoodle. For the complete grooming overview see Goldendoodle Grooming Guide.
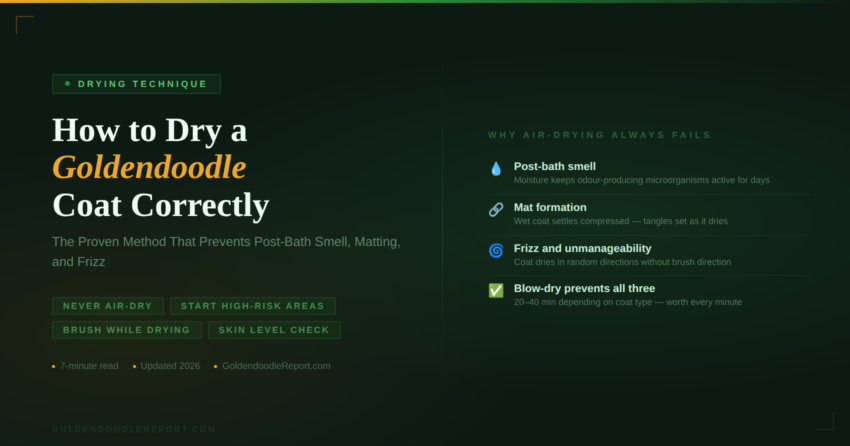
Why You Cannot Air-Dry a Goldendoodle Coat — What Always Goes Wrong
Air-drying seems convenient and harmless. For a Goldendoodle coat it produces three predictable problems every time.
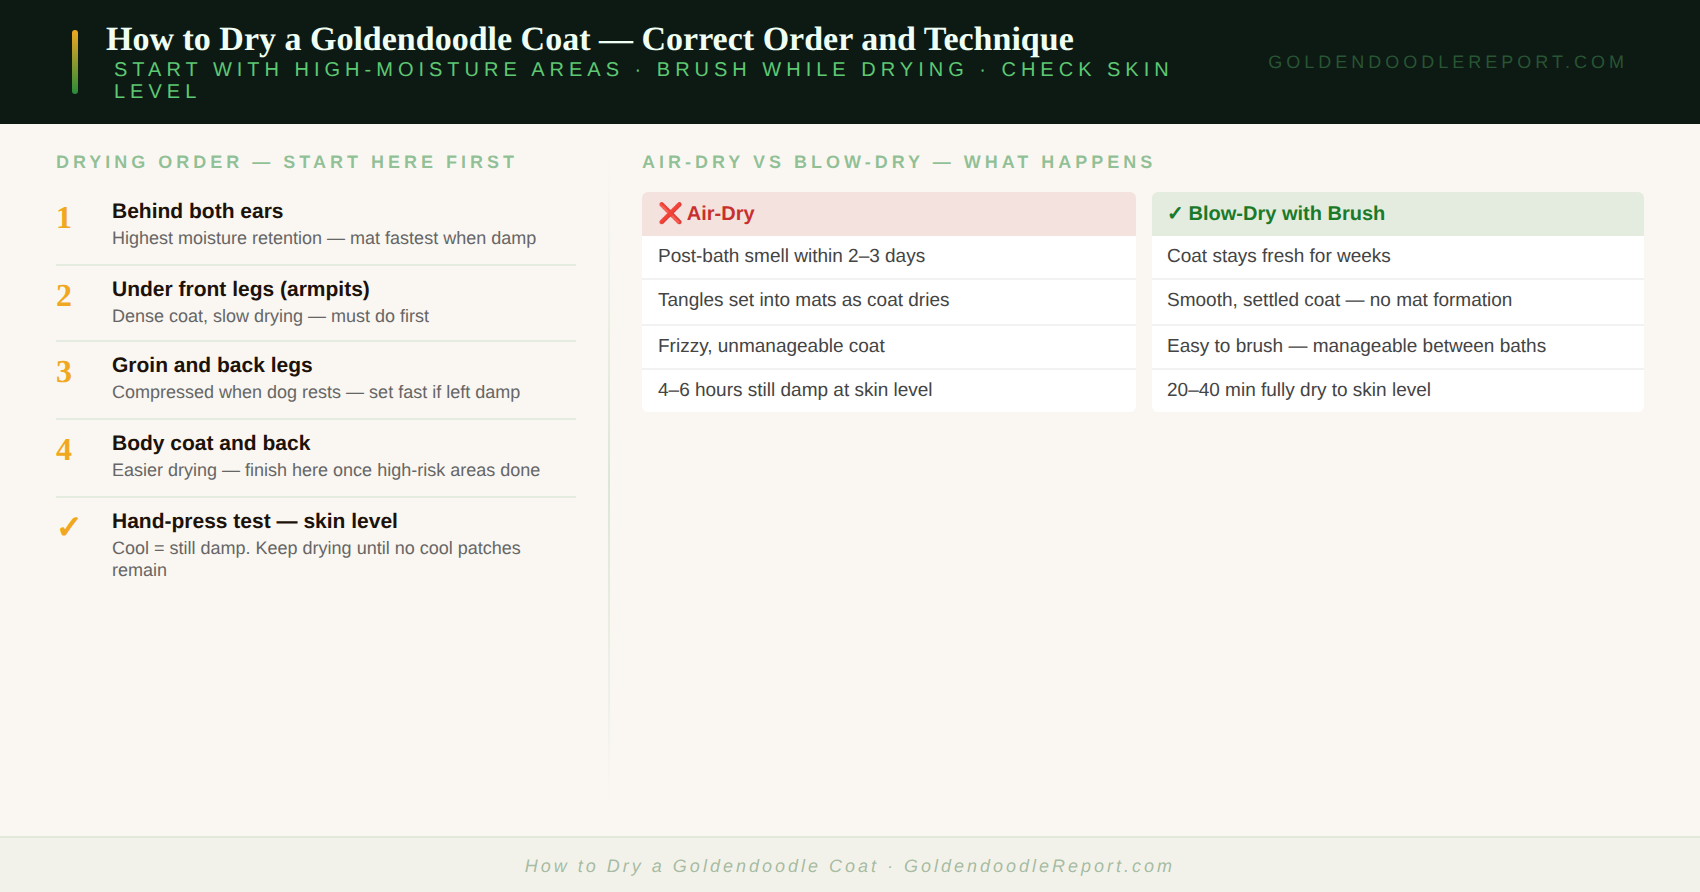
Post-bath smell. The Goldendoodle coat — particularly curly and wavy types — is dense enough to retain moisture for hours when air-dried. That sustained moisture keeps the bacteria and yeast that live naturally in the coat active and producing odour compounds. The longer the coat stays damp, the more compounds accumulate. This is why Goldendoodles that are air-dried smell musty within two to three days of bathing. Blow-drying eliminates the moisture that drives the smell — the same dog who smells within days when air-dried will stay fresh for weeks when properly blow-dried.
Mat formation. A wet coat is more elastic and more prone to tangling than a dry coat. When a Goldendoodle air-dries, the coat settles into whatever position the dog rests in — typically compressed, folded, and tangled at the high-risk mat areas. As the coat dries in that position, the tangles set. What was a loose tangle when the coat was wet becomes a semi-set mat when dry. Every air-drying session is a mat-formation session.
Frizz and unmanageability. A properly blow-dried Goldendoodle coat is smooth, settled, and easy to brush. An air-dried coat is frizzy, expanded, and significantly harder to manage — because the coat dried without the tension and direction that brushing while drying provides. Owners who have never blow-dried their Goldendoodle and then try it for the first time are consistently surprised by how different the coat looks and feels.
Tools You Need to Dry a Goldendoodle Coat Correctly
Dog dryer (recommended)
A dedicated dog dryer — sometimes called a force dryer or high-velocity dryer — is the professional tool for drying Goldendoodle coats. It produces a high-velocity airflow at a lower temperature than a human hairdryer, which dries the coat faster without overheating the skin. The high-velocity airflow also removes loose hair and fluffs the coat as it dries, producing a better finished result than a human hairdryer.
Dog dryers range from compact home models to professional salon units. For home use, a mid-range model with adjustable speed and temperature settings is sufficient. See 👉 Best Dog Dryer for Goldendoodles — coming soon for specific recommendations.
Human hairdryer (acceptable with caution)
A human hairdryer works for drying a Goldendoodle coat but requires more caution than a dog dryer. Human hairdryers run hotter than dog dryers and can cause skin discomfort or damage if held too close or left in one position. Always use the lowest heat setting — never high heat — and keep the dryer moving. Hold the dryer at least 6–8 inches from the coat and never direct high heat at the same spot for more than a few seconds.
Slicker brush
The same slicker brush used for regular brushing is used during drying. Drying while brushing produces the smooth, settled coat that makes post-bath brushing easy. The brush directs the coat as it dries, preventing the frizz that forms when coat fibres dry in random directions. See 👉 Best Brush for Goldendoodles — coming soon.
Absorbent towel
Used before the dryer to remove the majority of surface moisture. A microfibre dog towel absorbs significantly more moisture than a standard bath towel and reduces the total drying time considerably. Press and squeeze the coat with the towel — never rub. Rubbing with a towel tangles coat fibres and creates exactly the frizz that careful drying is designed to prevent.
How to Dry a Goldendoodle Coat — The Exact Correct Technique
Stage 1 — Remove excess moisture with towel
Before turning on the dryer, use a towel to remove as much surface moisture as possible. Press the towel firmly against sections of the coat and squeeze — work from the neck down the body, then the legs. The goal is to remove enough moisture that the coat goes from dripping wet to damp, which significantly reduces the total drying time.
Do not rub with the towel. The rubbing motion tangles the coat fibres in all directions — which is how air-dried coats develop the frizzy, matted texture that owners then struggle to brush out.
Stage 2 — Start with the high-moisture areas
This is the step most owners get wrong. The natural instinct is to start drying the back and sides of the dog — the easiest-to-reach areas. The correct approach is to start with the areas that hold moisture the longest: behind the ears, under the front legs, the groin area, and the base of the tail.
These areas hold moisture longer because the coat is denser, the skin is less accessible to airflow, and the natural body heat and compression in these areas slows evaporation. They are also the highest mat-risk areas — a damp compressed coat in these locations mats significantly faster than the easier-drying body coat.
Starting here ensures these high-risk areas are fully dry before the dog settles or loses patience with the drying session. If the session is cut short, better that the body coat is slightly damp than the mat-prone areas.
Stage 3 — Work through the coat in sections
Once the high-risk areas are dry, work through the rest of the coat in sections using the same parting technique as line brushing. Part the coat to expose the skin, direct the dryer at the skin level, and brush the section outward while the dryer runs. The combination of heat, airflow, and brush direction produces a smoothly dried, settled coat rather than a frizzy one.
Move the dryer continuously — do not hold it stationary on one area for more than a few seconds. The coat needs even heat and airflow across each section rather than concentrated heat on one spot.
Stage 4 — Check for damp patches at skin level
After working through the entire coat, press your hand firmly against the coat in each area and hold it for two to three seconds. Damp areas feel cool against your hand — the evaporation of residual moisture creates a cooling effect that is easy to detect. Any cool area needs more drying time regardless of how dry it feels on the surface.
The surface coat can feel dry while the dense base layer remains significantly damp — particularly in curly coats and in the high-risk areas behind the ears and under the legs. The hand test on the skin is the only reliable check for complete drying.
Stage 5 — Final brush-through
Once the coat is completely dry to the skin, do a final brush-through with the slicker brush followed by the metal comb to confirm the coat is smooth and mat-free. A properly dried coat should be smooth, slightly fluffy, and should allow the metal comb to pass freely from skin to tip without catching anywhere.
How Long Does It Take to Dry a Goldendoodle Coat?
Drying time depends on coat type, coat length, and the tool used. Approximate drying times for home use:
| Coat Type | With Dog Dryer | With Hairdryer (low heat) | Air-dry (not recommended) |
|---|---|---|---|
| Straight | 15–20 min | 25–35 min | 2–4 hours (with problems) |
| Wavy | 20–30 min | 35–50 min | 3–5 hours (with problems) |
| Curly | 25–40 min | 45–70 min | 4–6+ hours (with problems) |
These times assume a standard-length coat (2–3 inches). Longer coats take proportionally more time. The investment in drying time is offset by the reduction in mat-removal and post-bath maintenance time — a properly dried coat requires significantly less corrective work between baths.
How to Dry a Goldendoodle Coat More Easily — Practical Tips
Drying is the longest step in the bathing process and the one most likely to test a dog’s patience. Three things make it more manageable:
Introduce drying gradually to puppies. A puppy introduced to the sound and sensation of a dryer in short positive sessions from 8 weeks accepts drying calmly as an adult. A dog whose first experience with a dryer is a full blow-dry after a bath at 6 months often develops significant anxiety about the process. See Goldendoodle Puppy First Grooming Guide for the desensitisation protocol.
Use treats throughout. Drying sessions go more smoothly when the dog is periodically rewarded during the process. A long-lasting chew given at the start of the session occupies the dog while you work through the coat — particularly effective for the high-risk areas that require the most dryer time and attention.
Work quickly through the difficult areas. The areas that require the most drying — behind the ears, under the legs — are also the areas the dog is most likely to be uncomfortable with. Work through these areas first when the dog is fresh and cooperative rather than leaving them until the dog is already tired of the process.
For authoritative guidance on dog coat care see the AKC dog grooming guide.
⚠️ Drying Mistakes That Cause the Most Problems
- Air-drying instead of blow-drying — causes post-bath smell, mat formation, and frizz every time
- Rubbing with a towel — tangles fibres and creates frizz before the dryer even starts
- Starting with the body and leaving the high-risk areas for last — these areas hold moisture longest and mat fastest when left damp
- Drying only until the surface feels dry — the dense base layer can be significantly damp when the surface feels dry to the touch
- Using high heat — causes skin discomfort and can damage the coat. Always use low or medium heat
- Not brushing while drying — produces a frizzy set coat rather than a smooth settled one
✅ Your Next Step
The next time you bathe your Goldendoodle, replace air-drying with the blow-dry technique from this guide. Start with the high-risk moisture-holding areas, work through the coat in sections, and use the hand-press test to confirm complete drying. The difference in coat condition after drying — and in how long the coat stays fresh between baths — will be immediately noticeable. For the complete grooming guide see Goldendoodle Grooming Guide.
🔑 Key Takeaways
- Air-drying a Goldendoodle coat causes three predictable problems every time: post-bath smell, mat formation, and frizz. Blow-drying prevents all three
- Start drying with the high-moisture areas — behind the ears, under the front legs, groin — not the easy-to-reach body coat. These areas hold moisture longest and mat fastest
- The coat is not dry when the surface feels dry — it is dry when no cool patches remain at skin level. Use the hand-press test
- Press the towel after bathing — never rub. Rubbing tangles fibres before the dryer even starts
- Brush while drying — the combination of heat, airflow, and brush direction produces a smooth settled coat rather than a frizzy one
- Use low or medium heat only — high heat causes skin discomfort and can damage the coat
📚 Continue Learning
- Goldendoodle Grooming Guide — the complete grooming authority guide
- How to Bathe a Goldendoodle — the bathing protocol that precedes drying
- How to Brush a Goldendoodle — the brush-out technique used during drying
- Goldendoodle Puppy First Grooming Guide — introducing drying to puppies correctly
- 👉 Best Dog Dryer for Goldendoodles — coming soon
- 👉 Best Brush for Goldendoodles — coming soon
- 👉 Why Does My Goldendoodle Smell After a Bath — coming soon
- 👉 Goldendoodle Matting Prevention — coming soon
↑ Back to: Goldendoodle Grooming Guide | Goldendoodle Grooming — All Articles
Frequently Asked Questions
Can I air-dry my Goldendoodle after a bath?
Air-drying is not recommended for Goldendoodles. The dense coat — particularly curly and wavy types — retains moisture for hours when air-dried, keeping the microorganisms in the coat active and producing the post-bath smell most owners experience. Air-drying also allows the coat to settle in a compressed, tangled position that sets into mats and frizz as it dries. Blow-drying with a brush on low heat takes 20–45 minutes depending on coat type and eliminates all three problems air-drying causes.
How do you dry a Goldendoodle without it smelling?
Blow-dry the coat completely using a dog dryer or low-heat hairdryer with a brush. Start with the areas that hold moisture longest — behind the ears, under the front legs, the groin area — before moving to the body coat. After working through the entire coat, press your hand against each area at skin level to check for cool damp patches. Any cool area needs more drying time. The post-bath smell is caused by moisture in the coat keeping odour-producing microorganisms active — eliminating the moisture eliminates the smell.
How to dry a Goldendoodle coat — what is the best method?
The best way to dry a Goldendoodle coat is with a dog dryer or low-heat hairdryer combined with a slicker brush. First, press excess moisture from the coat with a towel — do not rub. Then work through the coat section by section with the dryer directed at skin level while brushing outward. Start with the highest-moisture areas first. Check for damp patches at skin level with the hand-press test before finishing. A dog dryer produces better results faster than a human hairdryer, but a human hairdryer on low heat is an acceptable alternative.
How long does it take to dry a Goldendoodle coat?
With a dog dryer: 15–40 minutes depending on coat type. With a human hairdryer on low heat: 25–70 minutes. Curly coats take longest because the dense curl pattern holds moisture more effectively than straight or wavy coats. Longer coats take more time than shorter ones. The drying time investment is offset by better coat condition between baths — a properly dried coat requires significantly less corrective brushing and mat removal than one that was air-dried.
Should I brush my Goldendoodle before or after drying?
Both — but in different ways. Before bathing, brush and comb the coat completely to confirm it is mat-free before water touches it. During drying, brush while drying — directing the coat with a slicker brush while the dryer runs produces a smooth settled coat rather than a frizzy one. After drying, do a final brush-through and metal comb-check to confirm the coat is smooth and mat-free to the skin. The three brushing stages — before bath, during drying, and after drying — are all part of the correct Goldendoodle coat care routine.
Disclaimer: The information in this article is provided for general educational purposes only. King James Adjei is a researcher and enthusiast, not a veterinarian or certified groomer. For health concerns or grooming questions specific to your dog’s condition, consult a qualified veterinarian or professional groomer.